
I am a man of my word. A figurative man.
Months went by and I didn't think much about how to make ham cake a reality. Then I drew up a schematic two weeks before the birthday and then didn't use the schematic at all. Just as Michelangelo saw an angel in the block of marble and used his chisel to free it, I saw a ham in the pile of cake and used a bread knife. Yeah what, I just compared myself to Renaissance master, whatcha gonna do?
The cake itself was red velvet cake, which I baked the night before assembling (so the cake would be cold and easier to work with).
Red velvet cake is a buttermilk cake that has a little cocoa powder and a ton of red food coloring in it. I used up all of Emily's red food coloring which she had bought for making fake blood for zombie movies a few years ago. We do not anticipate needing a lot of fake blood for zombie movies anytime soon.

I had originally planned on making a full-size ham cake, but then I realized that is a shit ton of cake and we don't have enough people to eat it all. So instead I made a half-size one using a half-sheet of cake (one 9x13 pan's worth).
First, I cut the rectangle of cake in half, then split the layers.

Never done that before. I like the way split-layer cakes look when cut, though, because the insides are that much more intricate.
Protip: Whenever you frost a cake, always lay down strips of wax paper or foil around the perimeter of the plate, then stack the cake on top of it. The foil will catch all that frosting you smear around and after you're done, you pull the strips out from under the cake and get a pristine presentation plate.

Boiled milk frosting(aka butter roux frosting):

The internet told me this is the traditional frosting for a red velvet cake. The process intrigued me so I gave it a shot, and now I am in love with this frosting. It's very light, silky smooth like a buttercream but not as oily, and easier to make.
I proceeded to cut the split half-rectangles into rough triangles, and stacked up a roughly triangular shape that got smaller higher up.


Then I took my really big bread knife and roughed out a ham shape.

It looks very pointy from the back.

Then came time for the crumb coat. Doing a crumb coat greatly improves the appearance of a frosted cake. Prior to doing your final coat of frosting, you smear on a thin layer that covers every square inch and seals in all the cake crumbs that would otherwise mar the outer surface if you tried frosting it in one go. You put the cake in the fridge for 30 minutes so the crumb coat sets up, then you do the real decorating.


At this point I had to go to Emily's to get my gel icing colors and run back and color the frosting. By then the crumb coat had set up, and I was ready to frost the outside for reals. I probably should have colored the frosting initially and had the whole crumb coat be colored too, because white frosting started peeking out when I spread the colored stuff too thin.
I don't have pictures of the rough job, but I do have pics of the cake after hot-knifing.
Hot knifing is when you take a metal spatula (or butter knife), dip it in hot/boiling water, wipe it on a clean towel and then use the hot knife to smooth out frosting. It gets rid of all the spatula marks that usually come from frosting a cake, and makes an uncanny smooth fondant-like finish.
Like this.


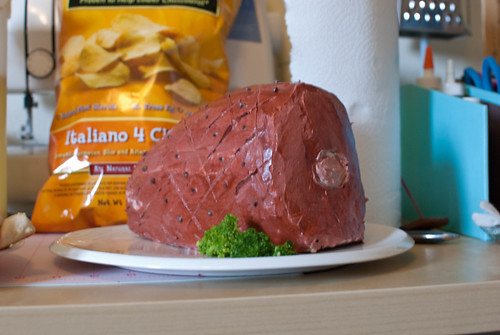
It's lucky that I used some cocoa powder to deepen the frosting color, because I'm pretty sure that's why there's so much depth to the color after hot-knifing. It really resembled the browning patterns you get from roasted meat.
I used dental floss to make the crosshatch pattern, then piped on tiny cloves with a ziploc bag with the corner snipped off.
Emily had the brilliant idea of styling the cake with some broccoli:
The inside:
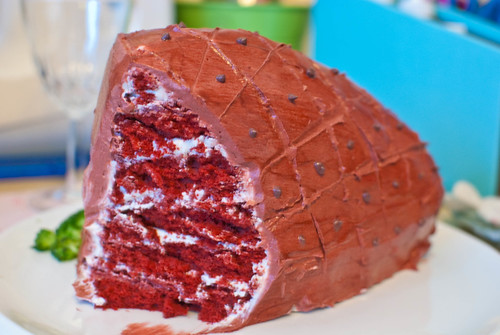
Lauren almost didn't want to cut into the cake, it looked so good. But it was made of cake and it was meant to be eaten.


That really is ridiculous and terrific. Meaty edible art!
ReplyDeleteThis is so awesome. You guys rule.
ReplyDeleteI enjoy how the cut cake looks a bit like marbled beef.
ReplyDelete